This article explains how to set up e-DHR Automation Rules to manage serial numbers within your DHR projects. These automations can also be adapted for other processes within your system.
Here’s what we’ll cover:
- Creating the e-DHR Project and Work Item
- Configuring the Serial Number Fields
- Setting Up the e-DHR Automation Rule
Creating the e-DHR Project and Work Item
- Create an e-DHR project: This will be the project your automation rule applies to.
- Create an e-DHR work item: This work item will have two key custom fields:
- Serial Number: This will be a list where users can select a serial number from a dropdown menu.
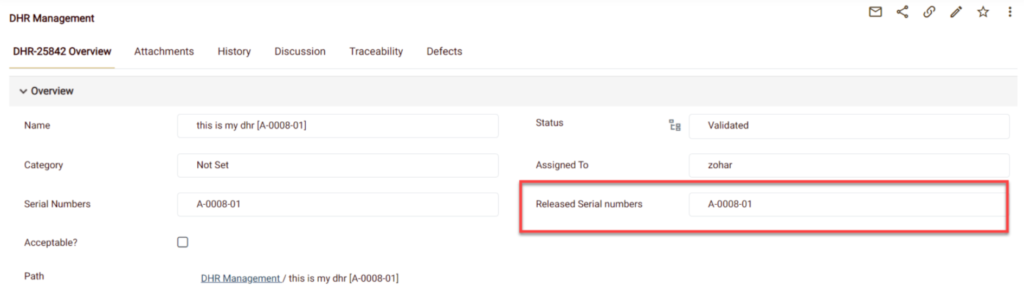
- Released Serial Number (Optional): This field will track the released serial numbers. It should be in a separate system table and a separate custom field. For convenience, we placed this field within the same form (as shown in the example image). When the e-DHR is validated (changing to a specific status you define), the selected serial number will automatically be added to the system table linked to the “Released Serial Number” field.

Configuring the Serial Number Fields
- Unique Value Selection: Set the “Serial Number” custom field to be based on “Unique”. This ensures users cannot select the same serial number for multiple e-DHRs.

Setting Up the e-DHR Automation Rule
- Navigate to the Automation Rule Configuration: Go to Admin > Automation > e-DHR Automation.
- Create a New Rule: Click the Add Icon at the bottom of the page.
- Define the Automation Rule Parameters:
- Project: Select the specific e-DHR project where you want this automation to be active.
- Work Item: Choose the e-DHR work item where the automation should run.
- Serial Number: Select the custom field containing the list of serial numbers (e.g., “Serial Number”).
- Concatenate Field Value to Name (Optional): If enabled, the e-DHR item name will be updated to include the chosen serial number.
- Place Holder: Define the placeholder characters that will be replaced with the actual serial number value (if “Concatenate Field Value to Name” is selected).
- Add to Released Serial Number: When enabled, the system will automatically add the selected serial number to the designated custom field tracking released serials.
- Status: Specify the e-DHR status that triggers the “Released” indicator for the serial number. Whenever the e-DHR form reaches this chosen status, the automation will copy the serial number from the “Serial Number” field to the system table linked to the “Released Serial Numbers” field.
- Released Serial Number: This field (pre-configured) contains the list of released serial numbers.
- Set Serial Number as default for child execution (Advanced): This option is for advanced users and updates the Serial Number in a specific test parameter reference table. It won’t be covered in this article.
- Serial Number Test Parameter (Advanced): Similar to the above, this option is for advanced users and updates a run parameter in the execution set. It won’t be covered in this article.
- Description: Provide a clear description of the e-DHR Automation Rule you’ve created.
By following these steps, you can create e-DHR Automation Rules that streamline your serial number management process and ensure accurate tracking within your DHR projects.
Let’s see an example:
This is the eDHR Automation rule:

So, in DHR Management project, when the Device History Record work item is created, the system takes the Serial Number value and concatenate it to the item name by replacing the char # with the serial number value.
When the Device History Record status changes to Validated – the system will copy the serial number value and add it to the Release Seerial Number custom field list

When save the item:

When the status changes to Validated, the value is added to the Released Serial Number field