OVERVIEW
This article describes the version management (Baseline) methodology in the Orcanos design control system.
PROJECT/ SOLUTION VERSION
The version created is called “View”. Although Orcanos supports 4 digits (Major.Minor.Release.Build), the version view is based on 2 digits (Major.minor).
The user is able to Advance the project version to a higher version (i.e. from 1.0 to 1.1 or to 2.0). In that action, the system will create a new view (2.0) that is based on 1.0 (baseline)
The Version View (major.minor) is used to login to the system, means, user can login to PROJECT A (1.0) and PROJECT A (1.1), while Orcanos is managing the delta between 1.0 to 1.1 in the background.
All the content of 1.0 is transparently available in the new version (2.0). It’s not really transferred, but Orcanos create smart pointers to allow you to manage the delta between each baseline. (i.e. added items, changed items, and deleted items).
MANAGE BASELINE DELTA


Use Case
Let’s take an example with the Cardiology Monitor Software project (note it may be participating in many solutions as sub-component under each solution, acting as common reusable data)
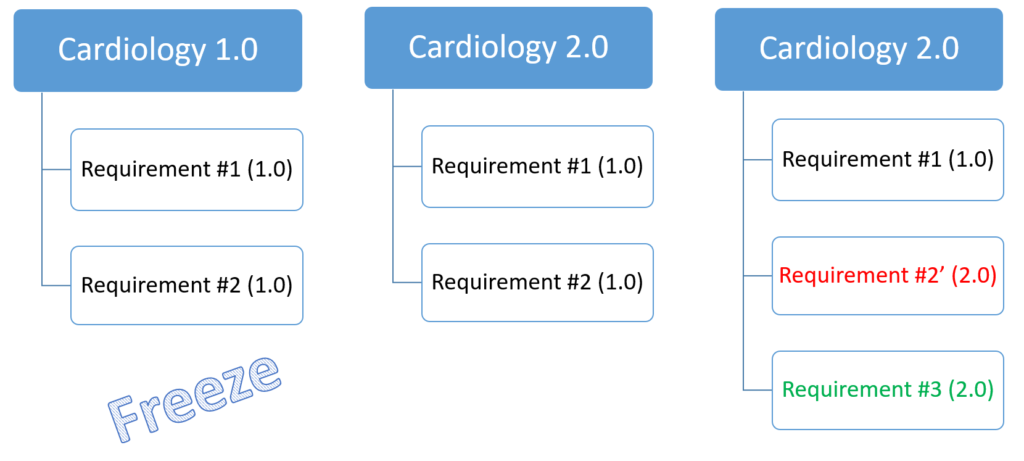
To begin with, we start with version 1.0, with 2 created items under version 1.0, items R1 and R2
Cardiology Monitor (1.0)
- R1 (1.0)
- R2 (1.0)
Now, the version is advanced to 2.0 in Admin. So now we have this state:
Cardiology Monitor (2.0)
- R1 (1.0)
- R2 (1.0)
project version is updated to 2.0 but the content remains 1.0 since no change was done yet.
Now let’s add an item while we login to version 2.0,
Cardiology Monitor (2.0)
- R1 (1.0)
- R2 (1.0)
- R3 (2.0)
R3 is added as a new item to 2.0 view and is not available in 1.0
Now change an item that was created in version 1.0. When changing item originally created in 1.0 in the following version (2.0) – the system will allow either to save to the original view (1.0) or branch the item, so the change is saved only in version 2.0, and the item is branched (content in 1.0 remains intact).
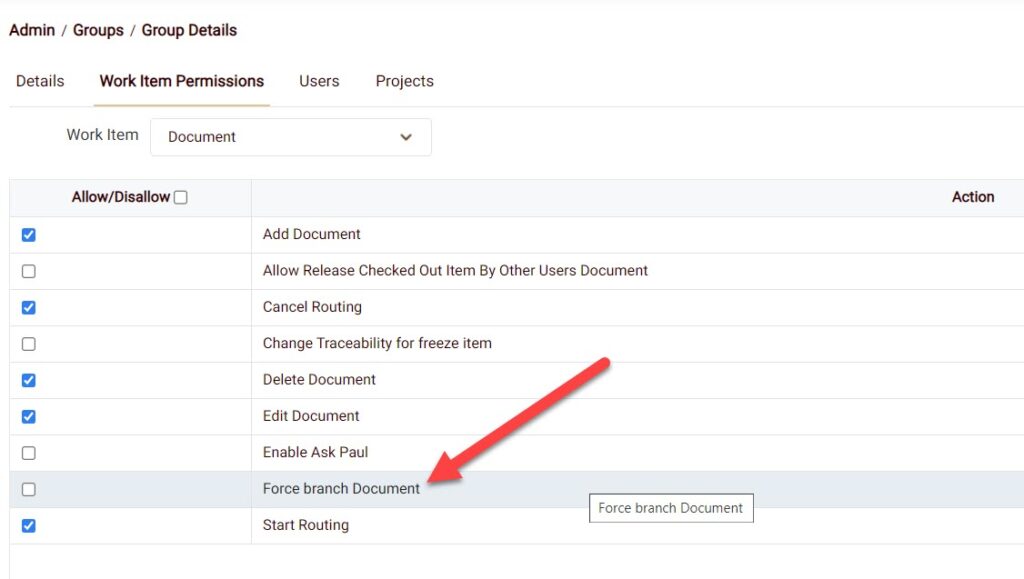
Note: You can lock version 1.0 so user is forced to create branch
So lets branch the item, our tree will look like this:

Cardiology Monitor (2.0)
- R1 (1.0)
- R2′ (2.0)
- R3 (2.0)
Now we open version 3.0 and remove the item (R2′), and add R4. Our tree will look like this:
Cardiology Monitor (3.0)
- R1 (1.0)
- R3 (2.0)
- R4 (3.0)
This way you can track changes between versions
WORKING ON NEXT GENERATION WHILE CURRENT GENERATION RELEASES ARE UNKNOWN
There are cases when we are currently on 1.0, we have a team that wants to work on next generation (2.0), but we know we will have 1.1, 1.2, 1.3…and we don’t know how many and we don’t know when
The challenge here is, that we don’t know how many minors we will have in 1.x, and we know that release 2.0 will be based on the latest (unknown) 1.X, which could be 1.3, 1.4, etc.
The solution here is manual.
What we will do is create the future versions ahead, means, create 1.1, 1.2, 1.3 assuming we won’t exceed a specific number of versions.
Then we create 2.0
Then we disable 1.1, 1.2, 1.3… so the user can only see 1.0 and 2.0
Every change we do in 1.0 will be available in all versions. Every change we do in 2.0 will only be seen in 2.0
now we enable 1.1. so all content of 1.0 is shown there. we make changes in 1.1 – all changes will be applied to 1.2, 1.3, 2.0 but not in 1.0
Another use case: We already have 2.0 and we started working on it, and now we need to add 1.1, 1.2 and so on (so the items related to 2.0 will be only in 2.0)
In this case we need to do the following:
- Change the version label from 2.0 to 1.1
- Add new versions (1.2, 1.3…1.5) and last version added will be 2.0
- So now we have 1.1, 1.2 and so on and 2.0 all identical
- Move the Items that are labeled as 1.1 from 1.1 to 2.0 (by “Move to view“)
- Now 1.0, 1.1, 1.2 .. become identical and 2.0 has the same data as they had before
MORE INFORMATION
Force Branch permissions – to force user creating branch, so data in the previous version remains intact

Advance/edit project version – you can open new version, lock version for login, edit version number, freeze version for changes, delete version

Cancel Branch – select an item on the tree view, right-click and select “Cancel Branch” to cancel branch of item. This will revert the item to the previous version
Move to view – move an item from one view to another

